
STORIES WE THINK YOU'LL LIKE


Valorem Reply Recognized as a Microsoft Fabric Databases Featured Partner
Valorem Reply is proud to announce that we have been recognized as a Microsoft Fabric Databases Featured Partner. This designation highlights our early adoption of Microsoft Fabric’s SQL-based database capabilities and our deep expertise in delivering enterprise-grade data solutions powered by Microsoft Fabric.
Read More
Azure has an extensive list of built-in roles but if you need to restrict them further, you'll have to create a custom role. This article walks you step-by-step through a module for creating and managing custom roles in Azure.
Introduction
Roles permit users to act on Azure resources.
Azure has many out of the box Azure roles that you may apply to varying scopes. The most common scope being a resource group. If you look at any resource group’s Access control (IAM) Role assignments, you will see Owner and Reader roles assigned. To see all the roles do the following:
- Create or select a resource group in the Azure portal
- On the left of the portal click on "Access control (IAM)", then click on "+ Add” and select "Add role assignment". This will bring up the Add Role assignment dialog on the right of the portal
- Click the down-arrow on Role to see the list of roles that can be assigned and scroll through them. It’s quite extensive
As extensive as the built-in roles are, you may want to constrain even further. There is a security principle of Least privilege, which isn’t always facilitated with the out of the box roles. For example Azure released a new capability called Dedicated Hosts in January 2020 without any new out of the box roles that allows you to manage this specifically. This new Azure resource uses the following provider operation "Microsoft.Compute / HostGroups." This means, anyone that can manage compute resources can now create and manage this expensive 64 core Azure resource. In order to restrict this permission, you will need to create a custom role.
In creating custom roles, you will need to understand the roles that your company supports and their scope of access to Azure resources. Custom roles are accessed via subscription but stored in Active Directory across all subscriptions which presents some unique concepts and challenges.
This article is intended to help you be successful in your use of Azure Custom Roles.
This article uses PowerShell to exemplify how to manage Azure Roles and assumes you have rudimentary PowerShell skills should you wish to try some of the commands. We have another blog on how to create PowerShell modules that you may find of interest as well.
Role Object
Azure has a lot of great documentation, however there is nothing like loading an object in memory and analyzing what you have in order to know what you can use, as well as its structure. Let’s look at the Role object using Visual Studio Code. You can execute this PowerShell code in Visual Studio Code to follow along. Note: These commands use the PowerShell module Az vs the original AzureRM. Az is the cross-platform version of PowerShell Azure commandlets and the recommended module going forward.
Connect-AzAccount # if you aren’t connected to your Azure subscription
$roledef = Get-AzRoleDefinition -Name 'Contributor'
exit # set breakpoint (f9) on this line
This will generate the $roledef object in memory:
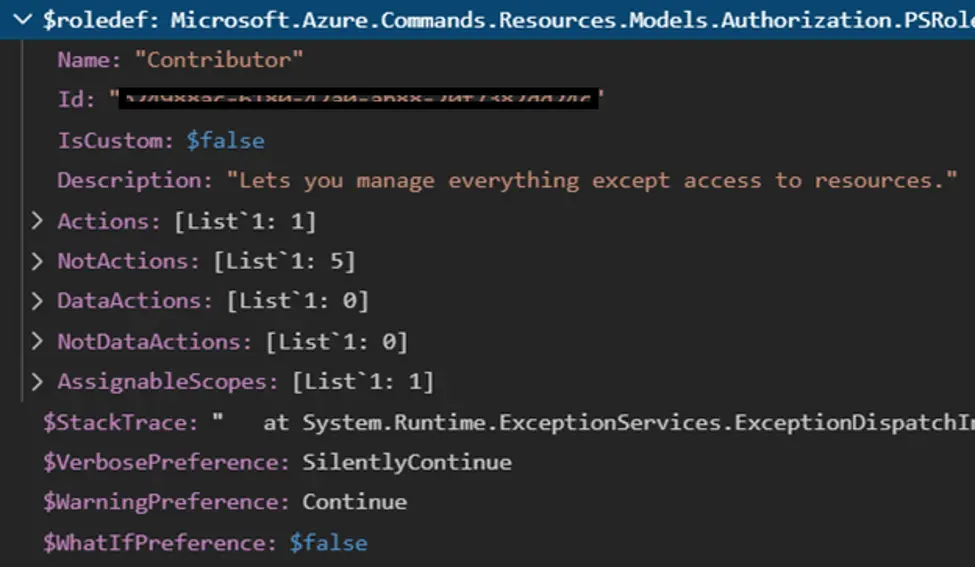
The key parts to know about this object are the Name, Actions and AssignableScopes. Name is key for retrieving but the real power is held in the Actions and AssignableScope. Let’s break them down.
Role Actions
The Role.Actions is a list of actions that are allowed for that role. You can specify NotActions as well. Since its a list, we can export it to a file and load it from a file. With the $roledef object above loaded in memory, we will use Set-Content to output the actions to a text file.
Set-Content -Path “$env:userprofile\documents\Contributor.Actions.txt” `
-Value $roledef.Actions
You will get a single line with * on it. Ok, not very interesting but it tells us that contributors can do anything. Wait, what about NotActions? … Let’s output that and see.
Set-Content -Path “$env:userprofile\documents\Contributor.NotActions.txt” `
-Value $roledef.NotActions
You will get the following:
Microsoft.Authorization/*/Delete
Microsoft.Authorization/*/Write
Microsoft.Authorization/elevateAccess/Action
Microsoft.Blueprint/blueprintAssignments/write
Microsoft.Blueprint/blueprintAssignments/delete
So now we know exactly what Contributors can and can't do. We can use this technique to understand every built-in role in Azure at a fine grain detail to see how its implemented. This is valuable in creating new roles or understanding how existing roles are implemented.
Role AssignableScope
AssignableScope can be at the subscription level or, more specifically, at the resource group. Let’s check the scope of Contributor.
Set-Content -Path “$env:userprofile\documents\Contributor.AssignableScope.txt” -Value $roledef.AssignableScope
This will yield "/" meaning its available for every subscription and resource. Let's say for instance, that you had a custom role called "Cosmos DB" in test and it only showed up on two test subscriptions. The scope output would look like:
/subscriptions/a1234567-890a-bcde-f012-34567890abcd
/subscriptions/b2345465-890a-bcde-f012-34567890abce
Azure context and Roles
One very important aspect of managing roles is that you can only do it from a subscription context that the role is in scope for. For example, in our prior list we have two subscriptions for the Cosmos DB role. Let’s say you were connected to a different subscription. To see your context, use the following commandlet: get-azcontext. Or, to see just the subscription id ID, use the following: $(get-azcontext).Subscription.Id.
It will returned an ID not in the assignablescope: c32345465-890a-bcde-f012-34567890abce.
Get-AzRoleDefinition -Name 'Cosmos DB' would return nothing or $null object.
In order to fix this, you would need to ensure your Azure context is set to one of the two subscriptions in order to Get, Set or Remove the role. You would need to connect or set your context accordingly.
Connect-AzAccount -SubscriptionId a1234567-890a-bcde-f012-34567890abcd
Set-AzContext -SubscriptionId a1234567-890a-bcde-f012-34567890abcd
Then Get-AzRoleDefinition -Name 'Cosmos DB' would work.
Updating the Role
One of tricks about managing roles is that you must have the rights to manage roles. If you don't have rights to any of the existing availablescopes or the ones you want to set, then you will get a "Linked scope" error. Not a very descriptive error, but in effect it means that you may have access and the right to the role but one of its "scoped" items you don't, so you can't change the object.
The best way to edit the role is to load the object, output the property you want to change to a file, then update the actions list or assignable scope from the edited file. Assuming you have edited the text file, here is what you do to update the role:
# Get the current role definition and overwrite the actions and scope
$roledef = Get-AzRoleDefinition -Name 'Cosmos DB';
$roledef.Actions = Get-Content -Path “$env:userprofile\documents\Cosmos DB.Actions.txt”;
$roledef.AssignableScopes = Get-Content `
-Path “$env:userprofile\documents\Cosmos DB.AssignableScope.txt”;
$roledef = Set-AzRoleDefinition -Role 'Cosmos DB';
Full list of Actions
Role actions are also referred to as actions, permissions and also as resource provider operations. The command that gets you a full list is:
Get-AzProviderOperation
You may want to use Start-Transcript and Stop-Transcript to capture the output to a file so you can search.
Actions follow the format: {Company}.{ProviderName}/{resourceType}/{action}.
ManageRoles module in PSGallery
To make it easier to manage Roles, we have created a module called ManageRoles and published it in the PSGallery. To install it, run PowerShell in administrator mode and execute this command:
Install-Module -Name ManageRoles
If you choose to load it, use the function Get-RoleHelp to start down the path of using its functions.
Get-Role - Writes a role's actions and scope to separate files
Get-RoleActions - Writes a role's actions to an action file named actions-<role>.txt
Get-RoleScope - Writes a role's scope to a scope file named scope-<role>.txt
Set-Role - Overwrites a role based on an actions file and a scope file
Set-RoleActions - Overwrites a role’s actions from an action file
Set-RoleScope - Overwrites a role’s scope from a scope file
New-Role - Creates a new role based on an actions file and a scope file
Remove-Role - Removes a role from active directory from all subscriptions (scope)
Summary
We hope this blog has helped you to understand how Roles are managed in Azure and how you can create your own custom roles to make operating in Azure more secure. Please keep an eye on the Valorem blog for more helpful tips!
Happy PowerShelling!
